This Boy | 2Crafty Chipboard | Layout

Sunday 9 June 2019


Hey there 2Crafty friends!
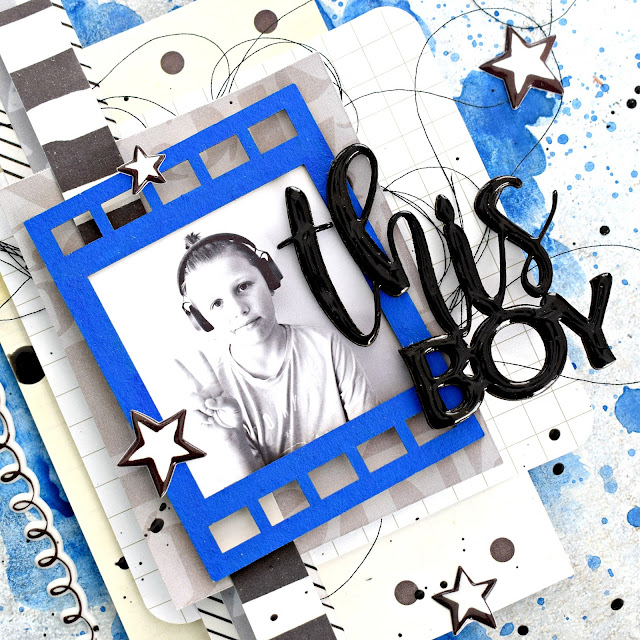
Jess here today with a grungy, boy's layout to share with you.

I used the following 2Crafty Chipboard to create with:
'This Boy title' 


I started my layout by adding a large & small water colour "blot" as well as some splatters. I then built up some layers of paper & cotton thread over both "blots". 
As I wanted my photo to be the main focus of my page, I decided to frame it with an 'Individual Film Strip' that I painted a nice bright blue.


To make the title 'This Boy' pop I covered it with a black glossy accent and adhered it to the frame. The contrast between the colours make both pieces really stand out!


To finish off my layout I added a 'Mini #Word - Selfie' to my smaller cluster along with two 'Asst Arrows'. I painted one arrow the same blue as the title. I then covered the other arrow and #selfie with more black glossy accents.


Thanks so much for stopping by my blog!

Jess xx


Puppy Love|2Crafty Chipboard|Layout

Thursday 9 May 2019


Hey there lovelies!
Today I have a layout featuring my fur baby Betty to share with you. When I saw the chipboard title "Puppy Love" I just knew it would be perfect for a Betty page.

I have been having a blast creating with chipboard & my pages now feel incomplete without it!


2Crafty chipboard used:


I painted the scallop frames with gesso then a pink acrylic paint. I finished them off by embossing them with a clear embossing powder.
Don't be afraid to use the negatives from the chipboard pieces, they can look awesome!


I coloured the apron lace border and title with an acrylic paint pen. If you want a bright, opaque look, paint the chipboard with gesso first.
I love chopping up chipboard and layering it for dimension, it's just so versatile!


And there you have it.
I hope you are inspired to scrap your fur baby!

Jess xx


Stay Unique| Cocoa Vanilla|Layout

Monday 6 May 2019


Hey there Lovelies,today I'm here with a bright, fun Cocoa Vanilla “Happiness” collection page to share with you! 
I’ve decided to scrap a selfie as I really wanted to inspire you to scrap a page all about YOU. So often we scrap everything else but ourselves, and I think we should scrap ourselves way more because we are FABULOUS and deserve to be part of the art we create! The brand new “Happiness” collection is perfect for a selfie page, as it’s so bright & colourful that it makes scrapping those pics of ourselves a fun happy process.
Of course I just had to start my page by adding some bright splotches & splats of watercolour, which I then layered with two different sized strips of “Little Things” paper.
I then cut different sized strips of the “Expressive” & “Sprinkles” papers, which I machine stitched through then layered over the biggest watercolour splotch. I also layered some of the clear watercolour “paint strokes” stickers over my own watercolour splotch to add colour & contrast. 
Using more clear stickers, die cut ephemera & Cut To You cut file butterflies I tucked them between my layers & popped them over my photos to add lots of dimension. I also added some cotton thread for texture.
I finished off my large photo cluster with a die cut title and word sticker. I absolutely LOVE how the midnight blue title really pops against all of the other colours!
Lastly I added a cluster of stitched paper, die cut ephemera, clear stickers & word stickers over the smaller watercolour splotch.
And there you have it, I hope I’ve inspired you to scrap yourself & get creating with some fabulous Cocoa Vanilla goodies!
Jess xx

Capture the Dab | 2Crafty Chipboard | Layout

Tuesday 23 April 2019


Hi there 2Crafty friends!
Today I have another layout to share with you & of course I've used lot's of 2Crafty goodness!

I can't get enough of creating with chipboard, I love how you can customise them to suit exactly what you need for each layout!


2Crafty chipboard used:


I used a variety of finishes on my chipboard pieces.
I painted the film strip and #capture title with black acrylic ink.
 I left the film strip with a matte finish and embossed the title with high gloss clear embossing powder.


I then covered one of the arrows and a polaroid frame with patterned papers. I love this technique as it means you can have your very own customised, co ordinating embellishments to suit any page!


Lastly I decided to create a bit of a grungy look on one of the arrows. I did this by painting the chipboard with absorbent ground then watercolour. I then embossed the piece with clear embossing powder. 


And there you have it.
I hope you are inspired to get creating!

Jess Mackenzie xx

Adore | 2 Crafty Chipboard | Layout

Monday 15 April 2019

Hi there Lovelies!!
I'm so excited to be sharing my first 2 Crafty layout with you!
I am absolutely thrilled to bits to be apart of the team and can't wait to share my
creations using lots of gorgeous chippy products.


It was hard to choose which products to use, as there are so many
 fabulous designs to work with.

I decided to go with:...

2Crafty Chipboard
"Adore" from the Fine Word Set 1


I coloured the medium butterfly, lace boarder and "adore" title in with a
 gold paint pen. I then embossed them with gold glitter embossing powder,
 because who doesn't love a bit of sparkle!


I primed the doily frames, the small butterfly & large butterfly 
with gesso then coloured them in with paint pens. 
I left the doily frames with a matte finish & added some shine 
to the butterflies by embossing them with clear embossing powder.


Don't be afraid to cut up your chipboard pieces! 
One of my favourite things to do is cut the butterflies in half and place them
 between my layers. This adds lots of dimension to your layout.


I created a small cluster at the bottom of my layout using a doily frame 
(which I cut in half), small butterfly and "adore" fine word. 
I bent the wings of the butterfly up slightly to create dimension.


There you have it!
I hope you've been inspired to create something fabulous with your 2 Crafty pieces.

Jess xx


CSI Case File #278 | Fun Times

Monday 1 April 2019

Well hey there!

Today I've cot CSI: Colour, Stories, Inspiration case file #278 to share with you.

You guys I had sooooo much fun with this case file. The colour palette is so fun & bright!

I was inspired by the colours and technology theme of the scene.


Purple is not a colour I gravitate towards, but I had so much fun using it on this layout!


Remember Hambly Screen Prints? Still one of my fave products, and I admit I've of got quite a stash I'm hoarding.


Always got to have a small cluster to offset the big one!


Do you love the colour palette of this case file? What will you be inspired to create?


Thanks so much for visiting my wee blog! Hope you can give the case file a go.

Jess xx